Description
The GenRocket Runtime generates data on your local machine or server. It acts like an engine on your local machine and follows the instructions within the Scenario to generate the test data.
The GenRocket Runtime must be installed on your local computer to run Scenarios and generate your test data. It will also need to be updated occasionally with the latest version. Complete the following steps to update GenRocket Runtime on your computer.
First Time User? Use the links below to run through the initial setup process for GenRocket:
- Windows: GenRocket Initial Installation and Setup
- OSX/Linux: GenRocket Initial Installation and Setup
In This Article
- When should the GenRocket Runtime be updated?
- When are the steps in this article not needed?
- How to Update GenRocket Runtime
When should the GenRocket Runtime be updated?
- Any time a new version of GenRocket Runtime is released.
When are the steps in this article not needed?
- Any time the update does not include a new version of GenRocket Runtime.
- In these instances, you can follow the steps here to update the appropriate Jar files.
How to Update GenRocket Runtime
Complete the steps below to update GenRocket Runtime on a Mac OSX/Linux computer:
Step 1 - Download GenRocket Runtime
- Log into the GenRocket web platform.
- Expand the Options Menu in the navigation bar.

- Click Download Runtime #.#.#. The version number you are downloading may not match the version in the screenshot.


Step 2 - Unzip and Rename the GenRocket Runtime File
The GenRocket Runtime file must be extracted and renamed before replacing the existing genrocket folder in your home directory.
Note: The images below show how to perform these steps for Mac OSX. Some steps might vary if you are using the Linux operating system.
Complete the following steps:
- Navigate to the directory where the file was downloaded. This is usually your downloads folder.
- Right click on the file and click Open to extract it automatically.

Note: If you use a specific extraction program, you may need to select the Open With option and then click on the appropriate application.

- When extracted, the folder name will appear like this: genrocket-#.#.# (the #'s are digits) and must be renamed.

- Rename the folder to genrocket.
- Right click on the folder name and choose Rename.

- Remove "-#.#.#" from the folder name.

- It will appear as shown below once renamed:


Step 3 - Replace the Older GenRocket Runtime Folder
Next, remove the old genrocket folder from your Home Directory and replace it with the new, unzipped genrocket folder.
- Navigate to your home directory:
- On MacOS/Linux, it is usually: /Users/*Your Username*/
- On MacOS/Linux, it is usually: /Users/*Your Username*/
- Delete the current "genrocket" folder. (Sometimes your folder might include the version number also "genrocket-#.#.#" (the #'s are digits))
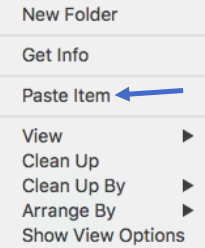
- Right click on the genrocket folder in the extraction location (usually your Downloads Folder) and then click on Copy "genrocket."

- Navigate to your home directory. For Mac OSX, use this shortcut key combination when viewing your files: CMD+SHIFT+H.
- Right click and select Paste Item to paste the folder into your home directory.


Step 4 - Run the "genrocket" command in the Terminal Window
Finally, run the "genrocket" command to complete the update.
- Open a new terminal session and type genrocket on the command line.
- Press the Enter Key. If you do not receive any errors, you are all set.

