Installation and Setup Overview
To install and get started with GenRocket, you will need to do the following:
- Review GenRocket Runtime Installation Requirements
- Install GenRocket Runtime to Your Local Computer
- Configure Resources in GenRocket (If Not Already Configured)
- Download Your Profile from GenRocket
- (Optional) Installation for Secure Environments
Note: To learn more about GenRocket Runtime, click here.
In This Article
- Step 1 - Review Installation Requirements
- Step 2 - GenRocket Runtime Installation and Setup
- Step 3 - Configure Resources in GenRocket
- Step 4 - Download Your Profile from GenRocket
- Step 5 - (Optional) Installation for Secure Environments
- Validating Installation
Step 1 - Review Installation Requirements
The installation requirements for GenRocket Runtime can be found here: GenRocket Runtime Installation Requirements.
Need to see a list of supported Java Versions? Java must be installed on the computer that GenRocket Runtime will be set up on. To see the complete list of supported versions, click here.
Step 2 - GenRocket Runtime Installation and Setup
Follow the links below to learn how to install GenRocket Runtime and complete the initial GenRocket setup on your local computer:
- Windows: GenRocket Initial Installation and Setup
- OSX/Linux: GenRocket Initial Installation and Setup
Step 3 - Configure Resources in GenRocket
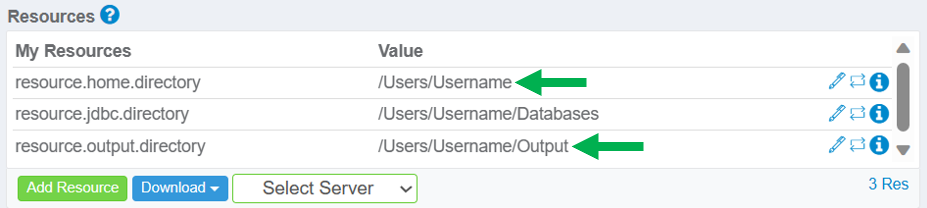
Resources define the directory paths used to download files and connect to a specified database from GenRocket. Depending on your Organization and how GenRocket is being used, one or several resources may need to be configured.
If these paths are not configured properly, you will not be able to complete Step 4 and Step 5 below. At a minimum, you must have a defined path for these two resources:
- resource.home.directory - Defines the home directory on your local computer.
- resource.output.directory - Defines the directory where generated files will be saved.
Important: If GenRocket will be used on a computer running the Windows operating system, the drive will need to be included in the Resource Value. Please see the image below:

No resource values should be left EMPTY in the Resources pane. If a value is not required, you must enter "N/A" or "..." as a placeholder.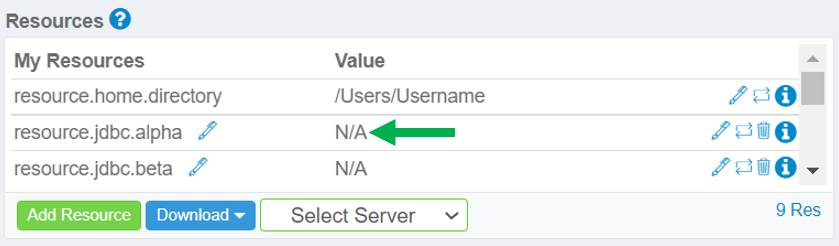
Note: For more information about configuring your resources, please see the Resources section.
Step 3a - Connecting to a Database
GenRocket can directly connect to any database that supports JDBC. To learn how to connect GenRocket to your database place, refer to this help article.
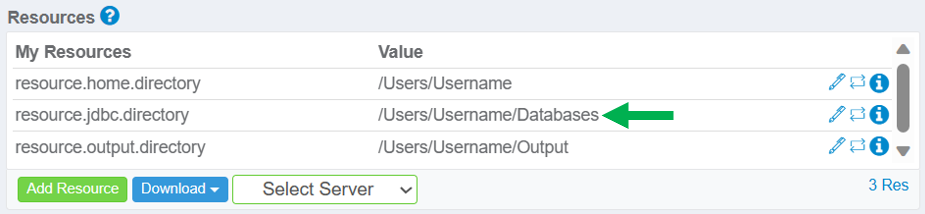
When JDBC is used to connect to a database, an additional resource will need to be configured:
- resource.jdbc.directory - Defines the base directory to a collection of JDBC property files.
Note: Additional resources may need to be configured based on your organization.
Step 4 - Download Your Profile from GenRocket
Follow the below links to learn how to download and install your Profile from GenRocket:
Step 5 - (Optional) Installation for Secure Environments
You can use GenRocket in a secure network or offline with one additional step - by adding an offline certificate to your .genrocket folder in your home directory.
You do not need an offline certificate if you are connected to the Internet in a non-secure/corporate environment. Please view this help article for a detailed description of how to download the certificate.
Validating Installation
If you believe the above requirements are met, you can verify everything is working by completing the following steps:
- Log into the GenRocket web platform.
- Create a Project with 1 Domain and 1 Scenario.
- Download the Scenario to your local computer.
- Run the Scenario on your local computer.
*You will not be able to download the Scenario if Steps 1 through 3 have not been completed correctly.
*You will not be able to run the Scenario if GenRocket Runtime has not been installed and set up correctly.