Overview
To set up the Unstructured Data Accelerator (UDA) and start generating PDFs from a template, a few steps must be completed to properly configure the Runtime environment. This guide walks you through the complete setup process for enabling PDF import functionality in your GenRocket environment. The setup includes configuring the runtime environment, installing required dependencies, and preparing necessary files.
- Prerequisites
- Step 1 - Enable UDA Import from PDF
- Step 2 - Download the UDA JAR File
- Step 3 - Download the Node Runtime Package
- Step 4 - Node.js Installation (per Operating System)
- Step 5 - Post-Installation (All OS)
- Step 6 - (Optional) Download Fonts Zip Folder for Signatures
- Next Steps
Prerequisites
- GenRocket Runtime - GenRocket installation directory access (For help, click here)
- Internet connection for downloading dependencies
- Administrative privileges (for Node.js installation)
Step 1 - Enable UDA Import from PDF
Ensure UDA Import from PDF is enabled. Contact support@genrocket.com if not.
Step 2 - Download the UDA JAR File
- Download the UDA Jar file from the GenRocket web platform under Options > Download UDA Jar.
- Place the file in the genrocket/lib directory (location varies by installation).

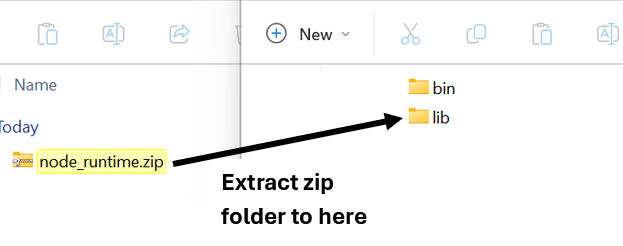
Step 3 - Download the Node Runtime Package
To learn more about Node.js, please see this web page: Node.js — Introduction to Node.js
- Download the Node runtime package from:
https://gr-groovy.s3.us-east-1.amazonaws.com/uda/node_runtime.zip - Extract the contents to the genrocket/lib folder. The extraction path will vary based on the operating system and where GenRocket Runtime is installed. Common paths include:
- Windows - C:\Users\<username>\genrocket\lib
- Mac OSx or Linux - /home/users/<username>/genrocket/lib
Step 4 - Node.js Installation (per Operating System)
To set up Node.js, follow these steps:
1. Node version 20.18.0 is required.
Windows - Using Installer
- Download Node.js v20.18.0 installer from: https://nodejs.org/dist/v20.18.0/node-v20.18.0-x64.msi
- Run the .msi file and follow the installation wizard. Follow the prompts for installation and use the default values.
- Verify installation with the following command:
node --version
npm --version
Linux - Using NVM (Node Version Manager)
Open a terminal window and use the curl command and other commands to download the installer and complete the install:
curl -o- https://raw.githubusercontent.com/nvm-sh/nvm/v0.39.0/install.sh | bash

source ~/.bashrc

nvm install 20.18.0

nvm use 20.18.0
MacOS - Using NVM (Node Version Manager)
Open a terminal window and use the curl command and other commands to download the installer and complete the install:
curl -o- https://raw.githubusercontent.com/nvm-sh/nvm/v0.39.0/install.sh | bash

source ~/.zshrc  # or ~/.bash_profile

nvm install 20.18.0

nvm use 20.18.0
Step 5 - Post-Installation (All OS)
Make sure the command window path points to the node_runtime location (Step 3 above). For local runtime installs, the path will be:
- Linux/Mac - /home/users/username/genrocket/lib/node_runtime
- Windows - C:\users\username\genrocket\lib\node_runtime
cd path/to/node_runtime/
Then run the command below:
npm install
Step 6 - (Optional) Download Fonts Zip Folder for Signatures
To generate PDFs with signatures using different fonts, you will need to download the fonts.zip folder. The folder should be unzipped and placed in your output directory - defined as the path for the resource.output.directory.
Fonts Zip Folder Link: https://gr-groovy.s3.us-east-1.amazonaws.com/uda/fonts.zip
Path Example

Note: You can also add your own fonts to this folder and use them when generating PDFs with signatures. Additional steps are required for adding signatures to a template in the Template Editor.
Next Steps
After a successful environment setup, you are ready to import a source PDF file, make any needed customizations to the created template, and export the template for Project setup. Click here to learn more.