Overview
This article shows how to import a source PDF file to create a customizable template. The template is exported once all changes are made and is used to set up the Project for test data generation. Please see the overview page for more information about the Unstructured Data Accelerator (UDA).
To test workflows, you can import documents like invoice PDFs, create a template, and replace fields—such as customer name, invoice number, and totals—with synthetic data.
After customizing the template, export it for the Project setup. Make further Project changes, like tuning Generators and configuring G-Cases for specific synthetic test data volumes.
In this Article
The following sections will help you become familiar with key terms and demonstrate how to use the Template Editor.
- Helpful UDA Definitions
- Template Editor - Used for Template Customization
- Additional Information and Help
- Prerequisites for PDF Import
- PDF Requirements and Best Practices
- How to Import a Source PDF (Unstructured Document)
- How Does the Template Translate to a Project?
- Best Practices for Labels and Variables
- How to Access the Template Editor After Saving
- Template Editor Sections and Options
- Extracted Field Section Options
- How to Add Manual Variables
- Altering Label / Variable Names or Values
- Auto-Refine Label and Variable Names Bulk Option
- How to Duplicate Variables
- Converting Labels and Variables
- Next Steps after Export
Helpful UDA Definitions
The following terms will be used throughout this article and are defined here:
| Term | Description |
| Template | A customizable model created from the imported source file that is used to perform initial project setup. |
| Extracted Field | A piece of data automatically extracted from a PDF document, such as a header or value (e.g, name header and actual value). Each extracted field can have a label, an automatic variable, or a manual variable. |
| Label | A constant value that appears in the template, such as section headers or column names in tables. Each label is a piece of text that remains the same across documents and has a name (what it is called) and a value (the actual text shown). Labels are not necessary if the text will never change, but they are handy if the constant value should differ for certain test data generations. |
| Variable | Placeholder text in the template that gets replaced with a new, synthetic (fake but realistic) value each time a document is generated (for example: first name, last name, date). Each variable has a name (like firstName) and a value (the changing content). |
| Automatic Variable | A variable that the system automatically creates for any field in the PDF source file that contains text. For example, if 'Invoice Number' has a value in the source file, it will become an automatic variable in the template. |
| Manual Variable | A variable that the user creates for any data item or placeholder not automatically detected in the source and not included in the template. Use this for empty fields or for new content you want to add, such as missing text, a QR code, or an extra image. |
| Canvas | The area in the Template Editor where you view pages of the created template, including all added labels and variables. |
Template Editor - Used for Template Customization
Before starting the customization steps, it’s important to understand what the Template Editor is and how it supports the PDF import process.
Use the Template Editor to view and customize a template made from your imported PDF. Importing a PDF that has all required fields filled in reduces preparation time and improves Generator assignment accuracy.
Automatic labels and variables appear for each extracted field. If a field, such as First Name, is filled in, it receives an automatic variable. These can be removed or modified as needed.
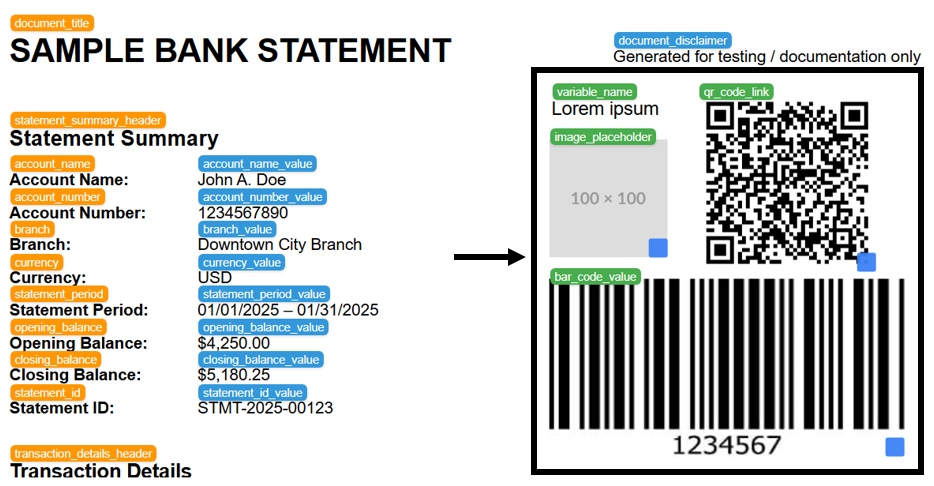
Options are provided to add a variable manually. This is helpful when a field is left blank on the imported source file. It is also helpful when you need additional text or a placeholder for images, QR codes, or barcodes. These can be added anywhere on the template for test data generation.

Additional Information and Help
Use the Help ? icon located in the top-right of the Template Editor to see additional documentation and shortcut information.

Select Guides or Shortcuts to view more information. Shortcuts is selected in the image below:

Prerequisites for PDF Import
Set up your environment for PDF import and generation before you start. Follow these steps: UDA Environment Initial Setup Steps.
PDF Requirements and Best Practices
Find PDF requirements and best practices here: Unstructured Data Accelerator (UDA) - PDF File Generation.
How to Import a Source PDF (Unstructured Document)
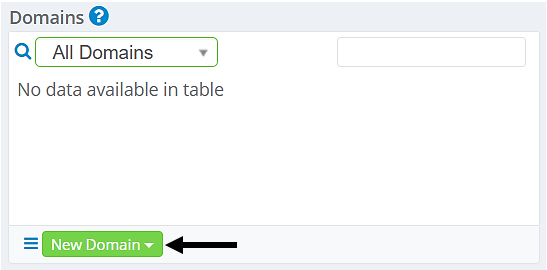
- Log in to the GenRocket web platform to begin.
- Create or select a project and its version.
- Expand the New Domain menu and select Import from PDF.

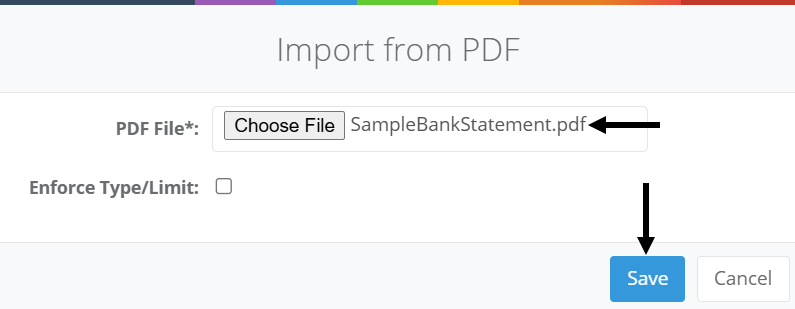
- Select Choose File, find the PDF, and select it.
- (Optional) Enable Enforce Type/Limit if desired. Clickhereto learn more.
- Select Save to start the import process.
- Wait for the import to complete. For delays, refresh the page or contact support if issues persist.

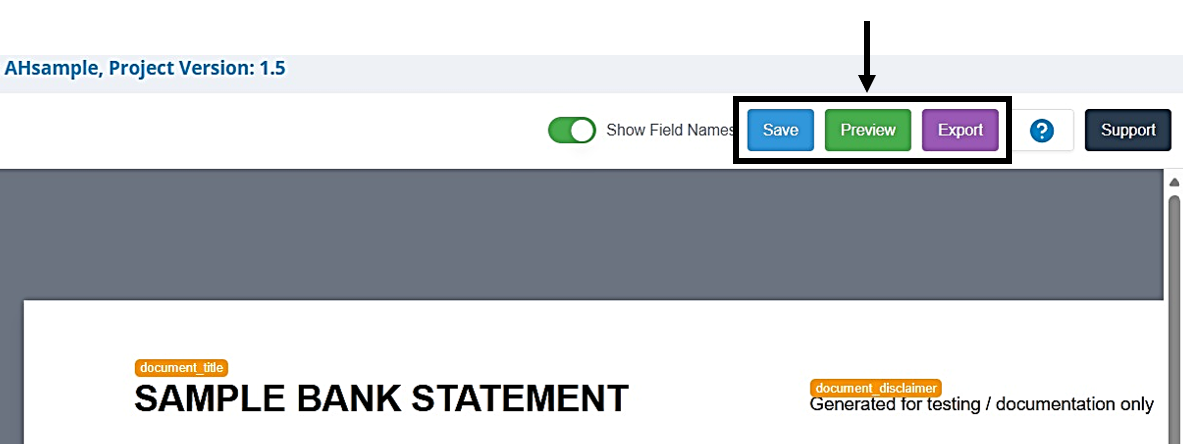
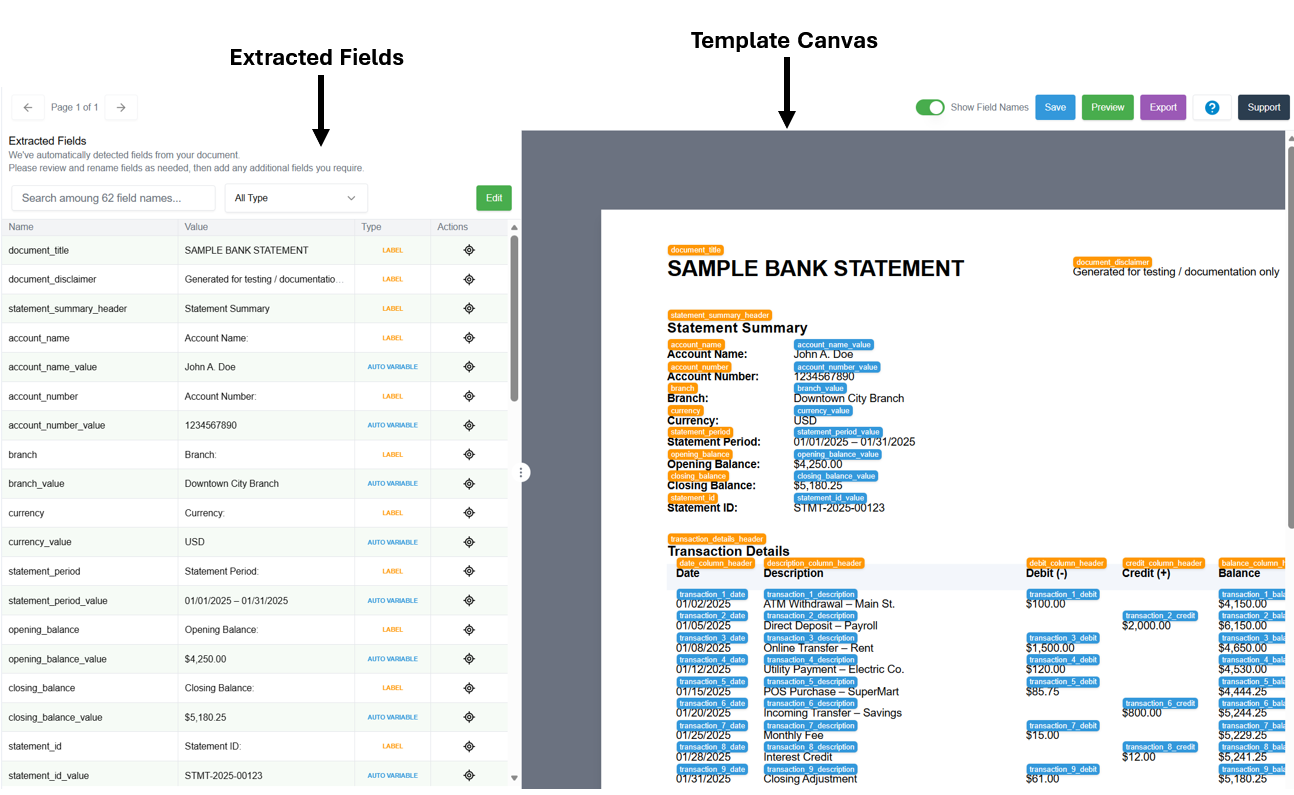
- After import, the Template Editor opens and displays the created template (shown below).
- The template may have Labels (orange) and Automatic Variables (blue). Users can add manual variables if needed, for example, when some fields are empty in the original file. They can also remove labels or variables as well as perform other actions in the editor.
- Be certain to make the required changes before exporting. Changes to the template cannot be made after importing.

- (Optional) Customize the template as needed. You may skip this step if no changes are required.
- Use the Save option to save changes as you make them. This allows you to go back and make more changes.
- Use the Preview option to see how the template will look.
- When ready, select Export to configure the Project using the template.
How Does the Template Translate to a Project?
- Document = Project Version in Project
- Page = 1 Domain (named page 1, page2, page3,...)
- Label / Variable Name = Attribute Name
- Label Value - Assigned the ConstantGenthat contains the text it represents in the PDF template.
- Variable Value - Synthetic test data, assigned a Generator based on the value to be generated.
Best Practices for Labels and Variables
- Use Clear, Descriptive Variable Names (e.g., customer_name, firstName, not value_1 or text)
- Use Consistent Naming Conventions (e.g., do not switch back and forth)
- Make Labels Clear and Reader Friendly (not overly technical or abbreviated)
- Use Unique Identifiers for Similar Labels or Variables Across Pages (e.g., add a suffix or prefix to distinguish each one.
- Remember: One variable, one purpose. Each variable should represent a single data element.
- For example, an address should be split into multiple variables, such as one for each line.
- address_line_1
- address_line_2
- city
- state
- zip_code
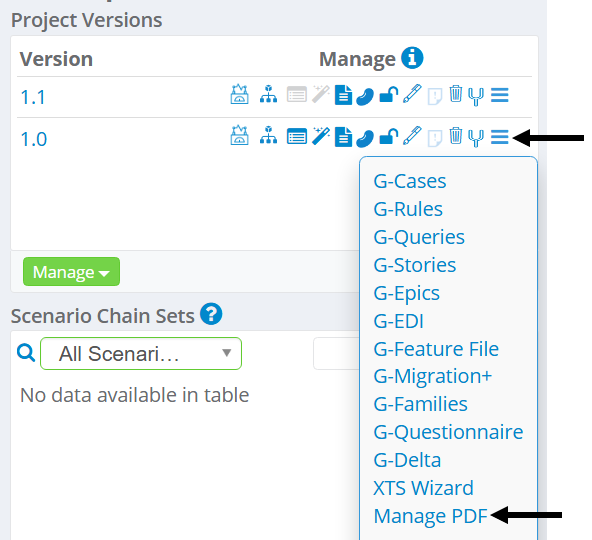
How to Access the Template Editor After Saving
The Template Editor opens after PDF import. To edit before exporting, save your template and follow these steps to access it again:
- Locate the Project and Project Version in the Project Dashboard.
- Select Manage PDF from the Self Serve Menu Options.
Template Editor Sections and Options
The Template Editor is divided into two primary sections, with options above them that apply to the template as a whole.
- Extracted Fields Section - Located on the left side of the editor. Used to manage (view, edit, remove) labels and variables in the template. Please note that each is color-coded differently in the editor so that they are easy to identify:
- Labels - Orange
- Automatic Variables - Blue
- Manual Variables - Green
- Template Canvas Section - Located on the right side and shows the template being modified. For multiple-page documents, it will display the currently selected page.
Options appear at the top of the Template Editor and apply to the whole template. Detailed descriptions follow below:

| Page # of # | Use to switch between pages when a PDF has more than one page. |
| Show Field Names Slider | Appears green when enabled and shows all labels and variables in the editable template. This information is hidden when disabled (the slider appears gray). |
| Save Button | Use to save any changes made to the template. Doing so also ensures it can be accessed and worked on later through the self serve menu options for the Project Version. |
| Preview Button | Preview the template to see how it will appear when test data is generated. |
| Export Button | Export the template to set up the Project for test data generation. Once exported, no additional changes can be made to the template. |
| Help (Question Mark) | View additional documentation information straight from the editor. |
| Support Button | Learn how to contact support for additional assistance. |
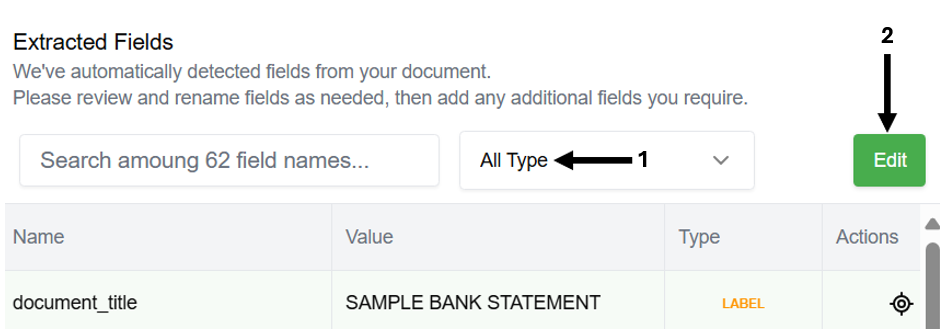
Extracted Field Section Options
Minimal options are available when not editing extracted fields. To see more options, select Edit to enter 'Edit Mode'. Remember, changes aren't saved until you select Apply. Actions include:
- Editing label or variable names and values.
- Targeting an extracted field within the template canvas.
- Deleting individual labels or variables.
- Duplicating one or more labels/variables.
- Select multiple fields to perform bulk actions. These include auto-refine, convert to label, convert to variable, and delete.
Use the numbers in the images below to identify each option in the table that follows them.
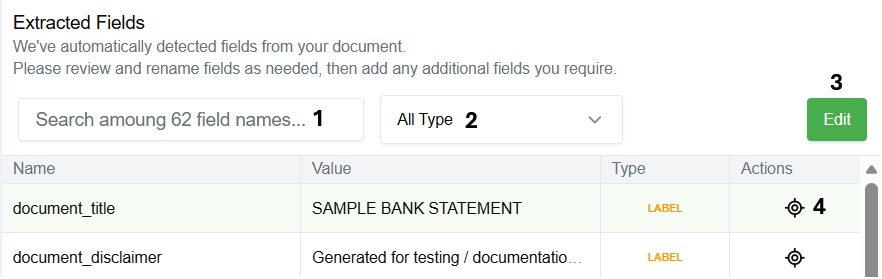

| 1 | Search | Enter a value to locate a field name within the selected page. |
| 2 | Filter Drop-Down | Filter displayed fields in the left pane. Filtering options are All Type, Automatic Variables, Manual Variables, or Labels. |
| 3 | Edit | Modify the template labels and variables for the extracted fields. |
| 4 | Target Icon | Go directly to the label or variable location in the template canvas. |
| 5 | Apply | Apply all changes made to extracted fields. |
| 6 | Cancel | Cancel any made changes and exit 'edit mode'. |
| 7 | Checkboxes | Select one, multiple, or all labels and variables to make changes. For all, select the checkbox to the left of the Name column header. |
| 8 | Auto-Refine | Refine the Generator field names to make them even more straightforward to ensure accurate Generator assignment. An underscore and the number 1 will be added (e.g., bank_statement_1). Select one or more fields using the checkboxes and then select this option. |
| 9 | Convert to Label | Convert any selected field names to a label. |
| 10 | Convert to Variable | Convert any selected field names to a variable. |
| 11 | Delete Button | Select multiple fields and remove them from the template all at once. |
| 12 | Delete Icon | Remove an extracted field from the template. |
How to Add Manual Variables
The steps to add a manual variable are the same regardless of the selected type. Additional steps are required within the created Project for image, QR, and barcode placeholders. They get added to the template here for Project setup. Each one is represented as an Attribute.
- Right-click anywhere in the canvas.
- Select an option from the pop-up menu:
- Add Text Variable - Insert a new text variable at the selected position.
- Add Image as Variable - Add an image placeholder at the selected position.
- Add QR Placeholder - Add a QR placeholder on the page.
- Add Barcode Placeholder - Add a Barcode placeholder on the page.
- Click and drag to move the item on the document.
- After adding, you can also change its name or value by entering 'Edit Mode'.
Note: A step-by-step guide for adding Text Variables that appear as different signatures in generated PDFs can be found here: UDA PDF Template - How to Make Text Look Like a Signature.
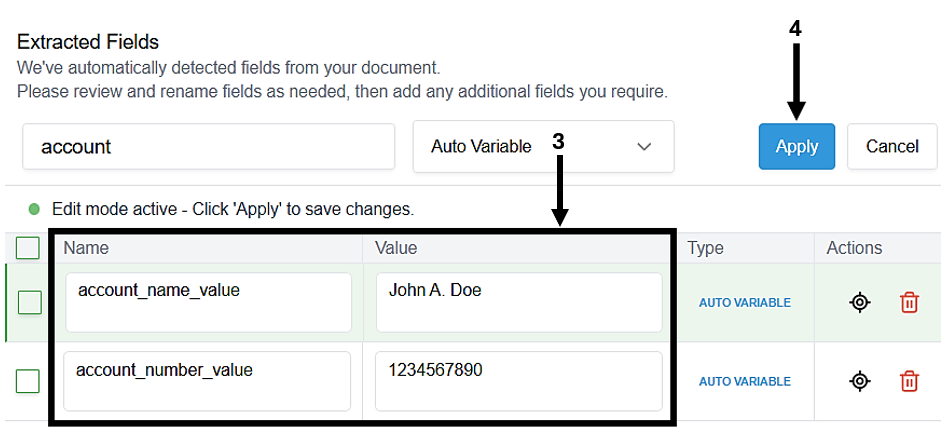
Altering Label / Variable Names or Values
All labels and variables have a name and a value. These can be changed within the Template Editor by entering ‘Edit Mode’.
- Use the Filter drop-down menu to change what is displayed or search for a specific field.
- Select Edit in the extracted fields section.
- Click on the Name or Value and change the text.
- Select Apply once finished to save the changes.
Auto-Refine Label and Variable Names Bulk Option
Label and Variable names are set for each extracted field when the template is created. The Auto-Refine option helps make these names clearer and aids accurate Generator assignment. For each selected item, an underscore and a number will be added to the end of the name.
- Use the Filter drop-down menu to filter what is displayed. For this example 'Label" has been chosen.
- Select Edit in the extracted fields section.
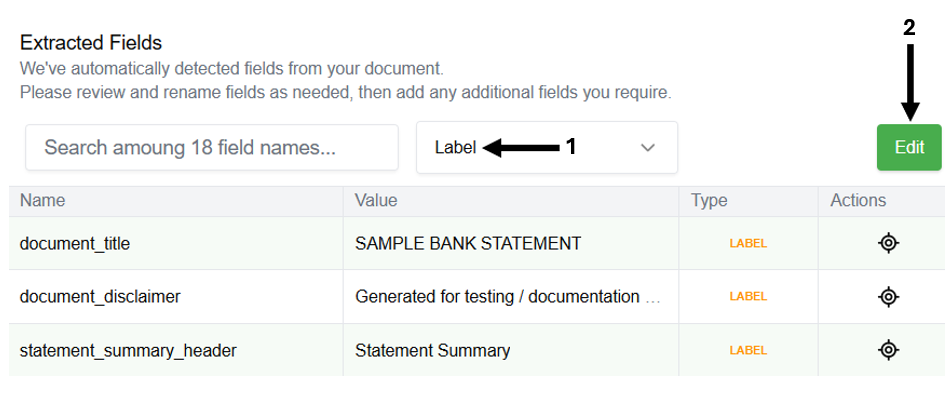
- Use the checkboxes to select one, multiple, or all labels for auto-refinement. All labels were selected in this example.
- Select the Auto-Refine option at the top of the table.
- Click Apply if everything looks good.

- Select Confirm to begin.

- For each label, the following has been added to the end of the name ‘_1’. Names can also be changed manually as needed. Remember to apply the changes to save them.

How to Duplicate Variables
A variable can be duplicated with these steps. Duplicated variables are created as Manual Variables.
- Right-click on the variable in the canvas and select Duplicate.
- Click and drag to position it correctly.

- Enter 'Edit Mode' to make any additional changes to the duplicated variable.

- The name of the duplicated variable will match the original's text.
- The name of the duplicated variable must be unique. Change the name and apply the changes.

Converting Labels and Variables
Labels and variables can be converted (from label to variable or from variable to label). A common use case is making a static field header dynamic with synthetic data. Conversion is a bulk action and follows these steps.
- Use the Filter drop-down menu to change what is displayed or search for a specific field.
- Select Edit in the extracted fields section.
- Select the variables or labels that require conversion using the checkboxes.
- Select the Tag button to convert selections to a Label, or select the (x) button to convert selections to a Variable.

- Select Confirm in the confirmation window.
- The Type column will now show Auto Variable for statement_summary_header_1.
- Select Apply to save the changes.

Next Steps after Export
Step 1 - Check the Project Version
Verify it has been properly set up. It should have the following and may take a few minutes to set up, depending on the template size:

| GrRoot Domain | Assigned the SegmentDataCreatorReceiver and GrRootScenario. |
| Domain for each page(page1, page2, ...) | Each contains an Attribute for each label and variable with a default assigned Generator. Assigned the SegmentDataCreatorReceiver to each. A Scenario should be present for each page. |
| PDF Template Domain | Assigned the PDFTemplateReceiver and PDFTemplateScenario. |
| Merge Domain | Assigned the JSONSegmentMergeReceiver and MergeScenario. |
| Scenario Chain | It contains all other Scenarios in the appropriate order for test data generation. |
| Domain Relationships | Automatically set up. |
| Configuration File | Created for the Project. |
Step 3 - Perform Generator Tuning
While Generators are automatically assigned, you may need to make changes to specific parameters for a Generator, assign a different Generator, or Link Generators to generate more complex data. This can be done using the Generator Tuning Wizard (view and modify from one location) or individually for each Attribute.
Step 4 - Set up G-Cases (Recommended)
To quickly generate a PDF and ensure everything is working correctly, users can adjust the GrRoot Domain loopCount. G-Cases are used to generate test data for different testing scenarios (e.g., negative, positive, load tests) and are highly recommended. More information can be found here. They can be used to generate a batch of documents that meets specific test criteria.
Step 5 - Test the Setup by Generating PDF documents
Generate a small batch of PDF documents through the command line. To generate PDF documents, users must complete a few steps, as detailed here. This guide walks a user through the process from beginning to end and shows how to generate Bank Statements containing synthetic test data.