Description
The Scenario Delete Wizard can be used to filter to a set of Domains, select one or more Scenarios, and have the matching Scenarios removed from each Domain.
In This Article
- How to Access the Scenario Delete Wizard
- Step 1: Take Ownership of the Wizard
- Step 2: Select Domains
- Step 3: Execute Changes
- Step 4: Confirm and Validate Changes
How to Access the Scenario Delete Wizard
- Select a Project within the Project Dashboard.
- Next, expand the Self Serve Options Menu for a Project Version and select XTS Wizard.
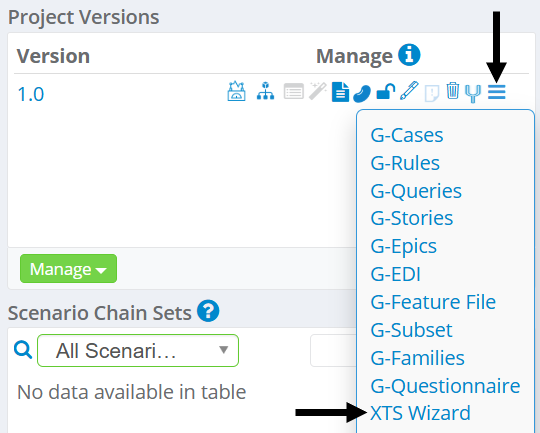
- Select the Scenario Delete Wizard.

Step 1: Take Ownership of the Wizard
- Click on the Take Ownership button.

- Click Yes to confirm.

Step 2: Select Domains
- Next, click on Select Domains.

- Select a Search Criteria option, enter a Keyword, and click Filter to view Domains matching the criteria:
- All - View all Domains.
- Exact Match - Domain name must match the entered keyword precisely.
- Begins With - Domain name must begin with the entered keyword.
- Ends With - Domain name must end with the entered keyword.
- Contains - Domain name must contain the entered keyword.
- Regex - Domain name must meet the defined regex criteria. Hover over the Regex option to view this criteria.

- For this example, All will be chosen.

- After clicking on the Filter button, each matching Domain will be displayed below the Search Criteria.

- The second column will have a checkmark if a Scenario is assigned to the Domain.
- The third column will have a checkmark if an assigned Scenario is locked.

- You can select all Domains by clicking on Select All option or select individual Domains using the checkboxes in the first column.

- Click on a Domain Name to view each Scenario that has been assigned to it and use the checkboxes to select or deselect individual Scenarios for deletion.

Step 3: Execute Changes
- Once finished, click on Execute Changes in the left pane.

- Click on the Start Execution button.

- Click Yes to confirm.

- The wizard will appear similar to below once execution has finished. Click on Home.

Step 4: Confirm and Validate Changes
- Click on Click to Confirm & Validate the Execution Changes.

- Click Yes to confirm.

- Click on XTS Wizards in the breadcrumb bar to return to the XTS Wizards.
