Description
This article provides step-by-step instructions for a new GenRocket Runtime setup on an individual's local machine or a shared, central machine running the Linux or Mac operating system. When running on a central machine accessed by many users, remember to set up Runtime in a shared, accessible location.
Note: If Runtime has already been installed, please see one of the following articles for making updates:
Important: These steps should be followed only after you have completed the prerequisite steps listed in this article: GenRocket Runtime Overview.
Dependencies
- GenRocket User Account - Required to download files and complete the GenRocket Runtime installation.
- Internet Connection - Required to download necessary files (Runtime, Helper Libraries, User Profile)
- Java Runtime - Versions 8 (except 1.8u20), 11, 17, 21, or 24
- GenRocket Jars - gr-engine.jar, gr-receivers.jar, gr-grepository-servers.jar, gr-grepository-clients.jar
Command Line Video Example
This video (5:54) presents a complete step-by-step process for installing the GenRocket runtime on a computer via the command line. Thus, it best targets individuals comfortable navigating to and operating within a command-line terminal.
Runtime Setup Step-By-Step Instructions
- Step 1 - Download GenRocket Runtime
- Step 2 - Unzip (Extract) the Downloaded File
- Step 3 - Rename the File to 'genrocket'
- Step 4 - Move to Home Directory
- Step 5 - Modify Environment Variables in the Shell Startup File
- Step 6 - Run the 'genrocket command in the Terminal Window
- Step 7 - Download Helper Libraries
- Step 8 - (Each User) Add Values for Organization Resources
- Step 9 - (Each User) Download Your Profile
- Step 10 - (Each User) Move Your Profile to the .genrocket Folder
- Validate Installation
Note: The images below show how to perform these steps for Mac OSX. Some steps might vary if you are using the Linux operating system.
Important: The genrocket zip file (downloaded in step 1 below) should be extracted or placed in a valid user directory. Do not use 'genrocket' for the username, as the runtime will reside in a 'genrocket' folder within the defined path. Full path examples are shown below:
- Correct - /home/someuser/genrocket
- Incorrect - /home/genrocket/genrocket
Step 1 - Download GenRocket Runtime
The zipped file can be downloaded directly from the GenRocket web platform or using a CURL or Wget command. The version number may differ from the one in the images and commands below. You can view the most recent version number in the GenRocket web platform (as shown in Option 1 below).
Method 1 - Download from the GenRocket Web Platform
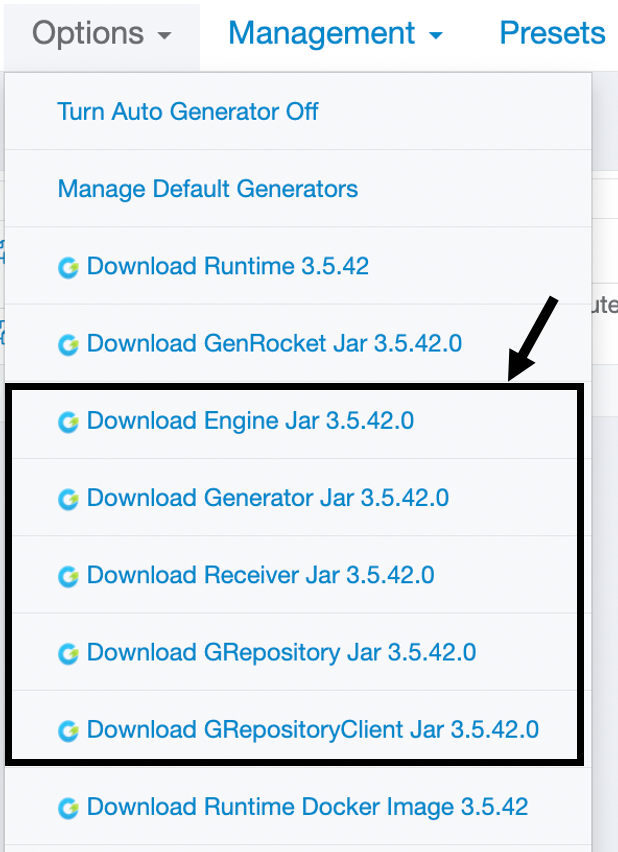
- Log into the GenRocket Web Platform
- Select the Options menu.
- Select Download Runtime #.#.##.

Method 2 - CURL or Wget Command
You can also use a wget command if it is supported by your operating system. Replace 'curl' with 'wget' in the curl command. The rest of the command is the same.
For more information, please see this article: Using CURL Commands to Download Runtime, Jars, Docker Image, and Server/User Profile.
Step 2 - Unzip (Extract) the Downloaded File
This can be done from a terminal window or through the user interface.
Method 1 - Command Line
Open a terminal window and ensure its path is set where the zipped file is located. Then enter this command (#'s represent the version number):
unzip genrocket-#.#.##.zip
Method 2 - User Interface
- Open Finder and navigate to the directory where the file was downloaded (e.g., Downloads folder).
- Right-click on the file and select Open to extract it automatically.


- When extracted, the folder name will appear like genrocket-#.#.# (the #'s are digits).

Step 3 - Rename the File to 'genrocket'
This can be done from a terminal window or through the user interface
Method 1 - Command Line
mv genrocket-#.#.## genrocket
Method 2 - User Interface
- Right-click on the folder name and choose Rename.
- Remove "-#.#.#" from the folder name.

- It will appear as shown below once renamed:

Step 4 - Move to Home Directory
Stop! You don't need this step if you download the genrocket runtime file to the home directory using a CURL or Wget command and unzipped it in that location.
Method 1 - Command Line
You can use the following command to move the genrocket folder to your home directory.
cp <file path> <destination path>
Example:
cp ~/downloads/GRXXXXXXXProfile.grp ~/.genrocket
Method 2 - User Interface
Move the genrocket folder to your home directory (typically /home/users/username). Complete these steps:
- Right-click on the genrocket folder and select Copy "genrocket".

- Navigate to your home directory using this shortcut key combination: CMD+SHIFT+H.
- Right-click and select Paste Item to paste the folder into your home directory.

Step 5 - Modify Environment Variables in the Shell Startup File
To complete the runtime setup, you'll need to edit your shell's startup file. This is where the permanent environment variables are stored. The required file is stored in your home directory, and the name differs per operating system.
What Shell File Name Should I Use?
Below are the two most common. The file name will vary per shell.
| Shell Name | Common Names |
| Bash shell (.bash) | Typically one of the following: .bashrc, .profile, or .bash_profile |
| Zsh shell (.zsh) | .zhrc (example - .zsg.zshrc) |
Bash Example 
Zsh Example
How to Access the Shell File
Open a terminal window and enter the following command. Replace <shell file name> with the name of the shell file (e.g., .zsg.zshrc, .bashrc, .bash_profile).
nano <shell file name>Examples:
nano .bash_profile
nano .zsg.zshrc
Environment Variables to Add to Shell File
Each should be added on its own line in the shell file.
| Variable | Value |
| GENROCKET_HOME Environment Variable | This is a user variable on a user's local computer but will be a system variable when Runtime is installed in a shared location. The variable should point to your home directory. Mac OS Value: export GEN_ROCKET_HOME=~/genrocket Linux OS Value: export GEN_ROCKET_HOME=/home/username/genrocket |
| PATH Environment Variable | This is a user variable on a user's local computer but will be a system variable when Runtime is installed in a shared location. Linux and Mac OS Value: export PATH=$PATH:$GEN_ROCKET_HOME/bin |
| JAVA_HOME System Environment Variable | This variable is already set in most instances if JAVA is installed. However, an invalid path can be present when using more than one version of JAVA, resulting in an error during setup. Therefore, it is recommended that you verify the path. Generic Example Value: export JAVA_HOME=<java path> |
| JAVA_OPTS System Environment Variable | Version 8 - JAVA_OPTS is Not Required Version 11 - Required JAVA_OPTS Variable Value JAVA_OPTS=-Xms512m -Xmx2048m --add-opens java.base/jdk.internal.loader=ALL-UNNAMED --add-opens jdk.zipfs/jdk.nio.zipfs=ALL-UNNAMED Version 17, 21, 24 - Required JAVA_OPTS Variable Value export JAVA_OPTS - JAVA_OPTS=--add-opens=java.base/java.lang=ALL-UNNAMED Note: -Xms512m -Xmx2048m is optional and can be helpful for generating a large amount of data. When used, it explicitly says to reserve a minimum of 512 MB memory and a maximum of 2048 MB. Optional JAVA OPTS Variable Value for Performance -Xms512m -Xmx2048m -XX:PermSize=512m -XX:MaxPermSize=2048m |
User Steps (.bash example)
- The first line should point to your path, which may vary per computer.
- For Mac OS, the default is the home directory. The first two lines will appear as shown below:
- The other line for JAVA_OPTS will be the same as shown above.
export GEN_ROCKET_HOME=~/genrocket
export PATH=$PATH:$GEN_ROCKET_HOME/bin

- Press Control+X to exit.
- Enter Y to save the change.

- Press the Enter Key to write to the displayed file.

Step 6 - Run the 'genrocket command in the Terminal Window
By putting $GEN_ROCKET_HOME/bin on the path, you can execute the shell script to complete the installation from any location.
Open a new terminal window and run the genrocket command. This will download the other dependent jars.
genrocket

If you do not receive any errors, you are all set. The above command should create a hidden .genrocket folder in the user's home directory or the shared directory (multiple users). You may need to unhide this folder to see it.
Did you receive an Error Message? Click here to see troubleshooting recommendations for typical GenRocket Runtime installation errors.
Step 7 - Download Helper Libraries
Next, run the genrocket -lib command to download the GenRocket Helper Libraries, which the Engine API, GMUS, and other GenRocket components require.
genrocket -lib

Note: If this command does not work on your machine, you can download these files from the Options menu in the GenRocket web platform. They need to be placed in the .genrocket folder in your home directory (usually /home/users/username/).
Step 8 - (Each User) Add Values for Organization Resources
Each user must perform this step in order to download their profile (required by Runtime). Three default resources are available (shown below). If any other resources appear here, your organization has added them. Please get in touch with your Org Admin for any resources outside of the default three.
Complete these steps to modify resource values:
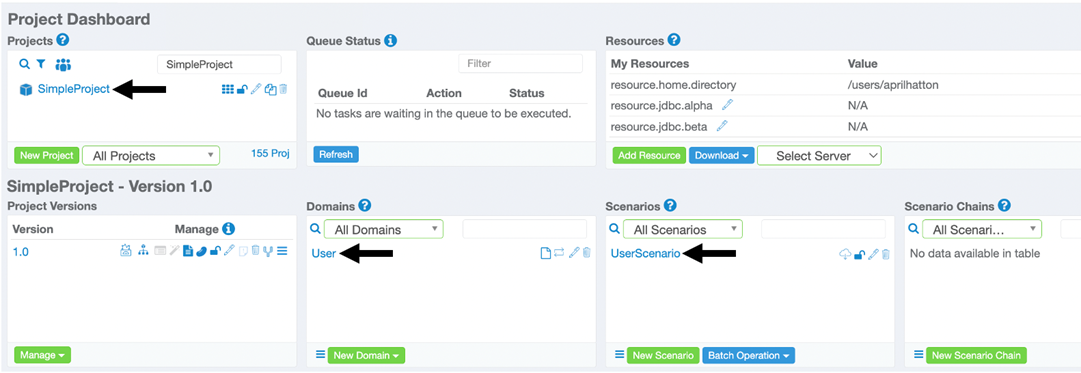
- Go to the Project Dashboard.
- Click the Pencil to fill in each resource value.
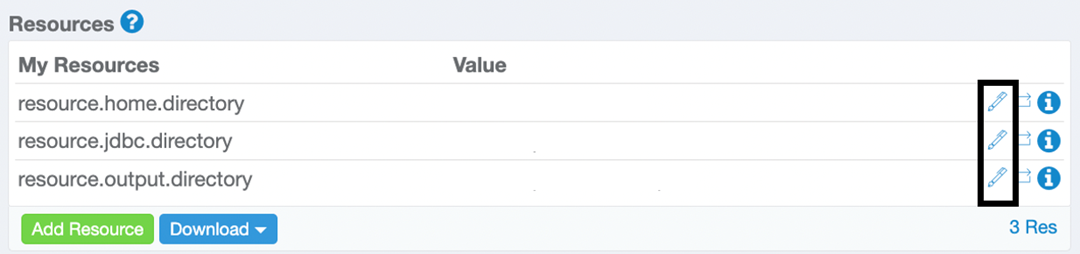
- The value for the resource.home.directory will be the user's home directory.
- /home/users/username
- e.g. - /home/users/johndoe
- You can find the home directory by running the following command in the terminal window:
echo $HOME
- The rest of the resource values can be any arbitrary location.

Step 9 - (Each User) Download Your Profile
Your user profile (GRXXXXXXXProfile.grp) is required to use the GenRocket Runtime. This file must be downloaded and placed into the .genrocket folder. For a shared machine, each User Profile will need to be placed in the .genrocket folder in the shared location where Runtime is installed. To learn more about this file, click here.
Method 1 - User Interface
- Log into the GenRocket web platform to view the Project Dashboard.
- In the Resources pane, expand the Download menu and select Download My Profile.
- The file will be downloaded to your Downloads folder.

Method 2 - CURL Commands
Two CURL commands are required for this method. The first command obtains the access token, which the second command requires. Organization ID and version information can be obtained from the GenRocket web platform. To see these commands and learn more, click here.
Step 10 - (Each User) Move Your Profile to the .genrocket Folder
This is the folder created in Step 6 of this article. You can move the profile by entering a command in the terminal window or using Finder.
Method 1 - Command Line
Use the following command to move the file to the .genrocket folder. Ensure the path points to the file's current location (e.g., downloads folder).
cp <file path> <destination path>
Example:
cp ~/downloads/GRXXXXXXProfile.grp ~/.genrocket
Method 2 - User Interface
- Open Finder and navigate to your Downloads folder.
- Right-click on your profile file and click Copy "GRXXXXXXXProfile.grp".

- Navigate to and open the .genrocket folder in Finder (this is usually \Users\<username>).
- This can be easily found on a Mac with this key combination CMD+SHIFT+H.
- Open the .genrocket folder, right-click in an empty area, and select Paste Item.

- You can now run GenRocket Scenarios on your local machine using GenRocket Runtime.

Validate Installation
After following the steps in this article, please take a few moments to verify that the installation has been completed. You'll be able to do so by following these steps.
- Log into the GenRocket web platform.
- Create a Project with 1 Domain and 1 Scenario.
- A sample project has been created with a User Domain and User Scenario.
- The DelimitedFileReceiver has been assigned and will generate one record as a delimited file.
- Download the Scenario to your local computer.
- Open a terminal window and make sure the source is set to your shell file. Example commands are provided below:
- Bash Command: source ~/.bash_profile
- Zshrc Command: source ~/.zsg.zshrc
- Run the Scenario by entering the following command in a terminal window:
- Command: genrocket -r <ScenarioName>.grs
- Example: genrocket -r UserScenario.grs
If you do not receive any errors and the file is created, then GenRocket Runtime has been set up correctly. File data is shown below:
