| Design |
Description
The Scenario Assignment Wizard is used to create a Scenario and assign it to a filtered set of Domains.
This wizard should be used:
- Any time an XTS Import has been performed for a Project Version.
- When a user wants to batch assign a Scenario to several Domains.
In This Article
- How to Access the Scenario Assignment Wizard
- Step 1 - Take Ownership of the Wizard
- Step 2 - Select Domains
- Step 3 - Execute Changes
- Step 4 - Confirm and Validate Changes
- Step 5 - Exit Wizard and Mark as Completed
How to Access the Scenario Assignment Wizard
This wizard can be accessed from two locations:
Project Dashboard
- Expand the Batch Operation drop-down menu.
- Select the Batch New Scenarios option within the Scenarios Pane.

XTS Wizard Dashboard
- Select a Project within the Project Dashboard.
- Expand the Self Serve Options Menu for a Project Version and select XTS Wizard.
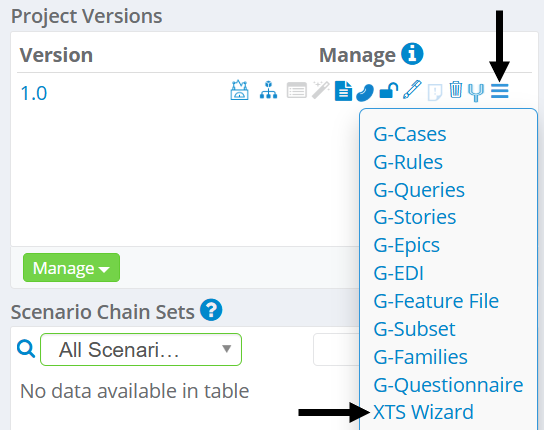
- Select the Scenario Assignment Wizard.

Step 1 - Take Ownership of the Wizard
- Click on the Take Ownership button.

- Click Yes to confirm.

Step 2 - Select Domains
- Click on Select Domains in the left pane.

- Select a Search Criteria option and enter a Keyword (if required). Click on Filter once finished.

Option Description All View all Domains. Exact Match Domain name must match the entered keyword precisely Begins With Domain name must begin with the entered keyword. Ends With Domain name must end with the entered keyword. Contains Domain name must contain the entered keyword. Regex Domain name must meet the defined regex criteria. Hover over the Regex option to view these criteria. - For this example, All will be chosen.

- The filtered set of Domains will appear below the Search Criteria.
- Use the checkboxes to select individual Domains or use the Select All option to select all Domains.

- If a Domain already has a Scenario, it will have a checkmark in the second column.

- If a Domain Scenario is locked, it will have a checkmark in the third column.

Step 3 - Execute Changes
- Click on Execute Changes in the left pane.

- Click on the Start Execution button.

- Click Yes to confirm.

- Click on the Home icon.

Step 4 - Confirm and Validate Changes
- Click on the Click to Confirm & Validate the Execution Changes button.

- Click Yes to confirm.

Step 5 - Exit Wizard and Mark as Completed
- Click on XTS Wizards in the breadcrumb bar to return.

- Click on Mark Completed for Step-5.

- Click Yes to confirm.
